PHOTO TIPS FOR CHOOSING & PROTECTING YOUR PHOTOS.
The better the photos you send me, the less guesswork I have to do, and the better the detail and overall portrait will be. Please read the following photo tips to get a better idea of the type of photos I need to paint a good portrait for you.
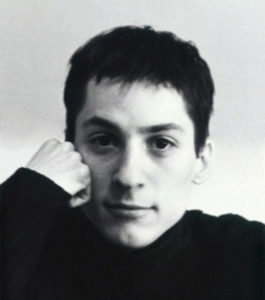
1st Tip: Choose photos where the subject can be clearly seen.
Make sure that the subject(s) in the photo can be clearly seen. If they are too far off in the background or if the photo is out-of-focus, it may be too difficult for me to see enough detail and to interpret their facial features accurately. If they are too close up to the foreground, their image may be cropped off or again blurred. It is my desire to try and capture their spirit and personality accurately. A clear image is the first and most important step to creating a great portrait of someone special that is to be cherished for years to come. If you cannot find a clearer image or if you have the perfect image with the exception of clarity, don’t worry. Send it to me anyway and I’ll judge whether or not it is possible for me to use. Sometimes a slight blur can have a great aesthetic quality. Sometimes a lack of detail can be a good thing.
2nd Tip: Choose photos with good lighting.
The second most important, if not the most important, element to creating a good portrait is lighting. If the photo you choose is too dark or if the camera’s flash was too strong and washes out the colors normally seen by the naked eye, it may not be the best choice. Lighting is everything. The color we see around us is due to the relationship between the objects and the light that either passes through it, gets absorbed, or is reflected off. Lighting is what allows us to see form and color. Try to select a photo where the lighting accurately emphasizes the subject’s form and color. Outdoor shots can be good as long as the subject is not facing direct sunlight.
3rd Tip: Choose photos that are in good condition.
Try to find a photo that is in good condition. If it is faded, the colors may be misleading. If it is wrinkled or torn, it may again make it difficult for me to see enough detail to translate their image accurately.
4th Tip: Choose photos that show the subject in a desirable pose.
Choose a photo that includes the right position or pose. If the posture is not good, for example the subject is slouching or leaning in an unpleasant fashion, try to find another photo. If you cannot, don’t worry. I’m pretty good at rearranging their posture and limbs if necessary, but it would make my job easier if the posture was close to what it should be. In other words, if you prefer the subject to be painted in a standing position, please try and find a photo where he or she is actually standing and not sitting or lying down.
5th Tip: If you become indecisive on which photos to send, then send more than one.
If you find yourself trying to choose between two or three photos to send and can’t decide, just send them to me and I maybe able to help you decide. Sometimes, I use more than one photograph anyway to help me paint just one subject. For example, I may use a head shot in one photo and the body and outfit of another. Whatever you decide to do, just please don’t send me an entire photo album.
6th Tip: Don’t become too obsessed with background detail.
Don’t worry so much about the background, even if it is to be included. We don’t want the background to steal the show
so-to-speak. If the background is to be included, just make sure it holds the level of detail that you desire to see in the portrait. When it comes to painting backgrounds, it’s usually common practice to merely give the impression of detail. But for the most part, it’s best to focus mainly on the subject, so the level of background clarity is not as important.
7th Tip: Scan your photos and send them electronically instead of sending the originals.
If possible, e-mail me high-quality scanned versions of your photo(s), or print them out at high quality and send them to me by regular mail, instead of sending original photo(s). Just make sure you scan your photos at high resolution (150-200 dpi. (dots per inch) or ppi. (pixels per inch). But if you have a really small photo like a 1″ x 2″ then scan at 250-300 dpi. or ppi.) And if you send them electronically as an attached file, be sure to use one of the following image formats: jpeg, .jpg, .bmp (bitmap), .gif or .tiff. Look at your file’s extension to check (example: Christine.jpeg).
8th Tip: Protecting your photos for mail delivery.
Only use this option if you really, really need to. Whenever you send anything through the mail, you are taking a risk. It is stated in My Policy and Rights page, that I cannot be held responsible for any damage that may occur to your photos during transit. The best way to insure the protection of your photos and to maximize their safe return is to sandwich the photos in between paper-board or cardboard. This will help to prevent any unwanted bending. It’s also a good idea to place them in something waterproof like clear plastic wrap or sandwich bags. Don’t use any plastic which has colored ink or text on it. Sometimes the commercial ink can bleed off onto your photos. If you send more than one photo, be sure to place plain paper (without ink lines) or waxed paper between each one, especially if the photos have something written on their backsides. The ink from such hand written notations can also bleed onto the photo just under it. If possible, use a Photo-Mailer specifically designed for sending photos through the mail. Such envelopes can usually be purchased at your local grocery store or from your local post office. Try to find envelopes that are larger than the photos themselves. Trying to cram photos into a small envelope is not a good idea.